Mac IoT SSH: Connect & Control Your Devices Today!
Can you securely access and control your Internet of Things (IoT) devices from your Mac without spending a dime? The answer is a resounding yes, and it's easier than you might think.
In today's interconnected world, the ability to remotely manage and monitor IoT devices is becoming increasingly essential. Whether you're a tech enthusiast, a developer, or a professional managing a network of devices, the need for secure and efficient remote access is paramount. This is where SSH (Secure Shell) comes into play, offering a powerful and cost-effective solution for establishing a secure connection to your IoT devices directly from your Mac.
This guide dives deep into the world of IoT and SSH, providing a step-by-step walkthrough to set up and utilize SSH for remote access on your Mac. We will cover everything, from the fundamental concepts of SSH and IoT to more advanced configurations and troubleshooting tips, ensuring you have the knowledge and tools needed to confidently manage your devices. Prepare to unlock a new level of control and convenience, all while maintaining the security of your valuable data.
- Naval Ravikant Krystle Cho Life Love Success Read Now
- Unveiling Amariah Morales Age Bio More Your Guide
Before we delve into the specifics, let's establish a basic understanding of the key components involved: IoT, SSH, and the benefits of their combined use.
IoT: IoT, or the Internet of Things, encompasses a vast network of interconnected devices that communicate and exchange data over the internet. These devices range from smart home appliances and wearable devices to industrial sensors and sophisticated machinery. The proliferation of IoT devices has dramatically increased the need for secure and efficient remote access solutions.
SSH: SSH is a cryptographic network protocol that provides a secure channel for communication between a client and a server. It's widely used for remotely accessing and managing servers, but it can be adapted for use with IoT devices as well. SSH encrypts all traffic between the client and the server, ensuring that your data remains confidential and protected from eavesdropping.
- Kino Yves Net Worth How He Built His Empire Earnings
- Enrica Cenzatti Andrea Bocellis First Wife Untold Story
Benefits of IoT SSH: Connecting to your IoT devices via SSH offers a multitude of advantages. Firstly, it provides a secure connection, encrypting all data transmitted between your Mac and the IoT device. This is crucial for protecting sensitive data and ensuring privacy. Secondly, SSH allows for remote management and control, enabling you to configure, monitor, and troubleshoot your devices from anywhere in the world with an internet connection. Thirdly, SSH can be set up without any additional software, relying on built-in tools on your Mac, making it a cost-effective solution. Lastly, it supports a wide range of devices, making it a versatile choice for various applications.
Here's the core information for what you need to know.
Prerequisites for Using IoT SSH on Mac
Before you begin setting up IoT SSH on your Mac, ensure that you have the following prerequisites in place:
- A Mac computer running macOS.
- An IoT device with SSH server enabled. (This typically involves enabling SSH on the device itself. Refer to the device's documentation for specific instructions).
- The IP address of the IoT device.
- Login credentials (username and password) for the IoT device.
- An active internet connection on both your Mac and the IoT device.
Setting Up SSH on Your Mac
Fortunately, macOS comes with a built-in SSH server, which simplifies the setup process. Here's how to enable it:
- Open System Preferences on your Mac.
- Go to "Sharing."
- Select "Remote Login" from the list of services.
- Ensure that the checkbox next to "Remote Login" is checked.
- You can optionally specify which users are allowed to access your Mac via SSH. Click on "Allow access for" and choose the desired option: "All users," "Only these users," or create specific "Groups."
Connecting to Your IoT Device Using SSH
Once you've enabled SSH on your Mac and have the necessary credentials for your IoT device, you can connect to it using the following command in the Terminal app:
bashssh username@device_ip_address
Replace `username` with your IoT device's username and `device_ip_address` with the device's IP address. For example:
bashssh pi@192.168.1.100
After entering the command, you will be prompted for the device's password. Enter the password and press Enter. If the connection is successful, you will be logged into the IoT device's command-line interface (CLI), allowing you to manage and control the device remotely.
Troubleshooting Common Issues
Sometimes, you may encounter issues when trying to connect to your IoT device via SSH. Here are some common problems and their solutions:
- Connection refused: This usually means the SSH server is not running on the IoT device, or there is a firewall blocking the connection. Ensure SSH is enabled on the IoT device and check your network configuration.
- Authentication failed: This indicates that you have entered an incorrect username or password. Double-check your credentials and try again.
- Network connectivity issues: Make sure both your Mac and the IoT device have an active internet connection.
- Firewall restrictions: If you are connecting from a network with a firewall, you may need to configure the firewall to allow SSH traffic (usually on port 22).
Advanced Configurations and Techniques
While the basic SSH connection is straightforward, there are more advanced configurations and techniques you can use to enhance your IoT SSH experience:
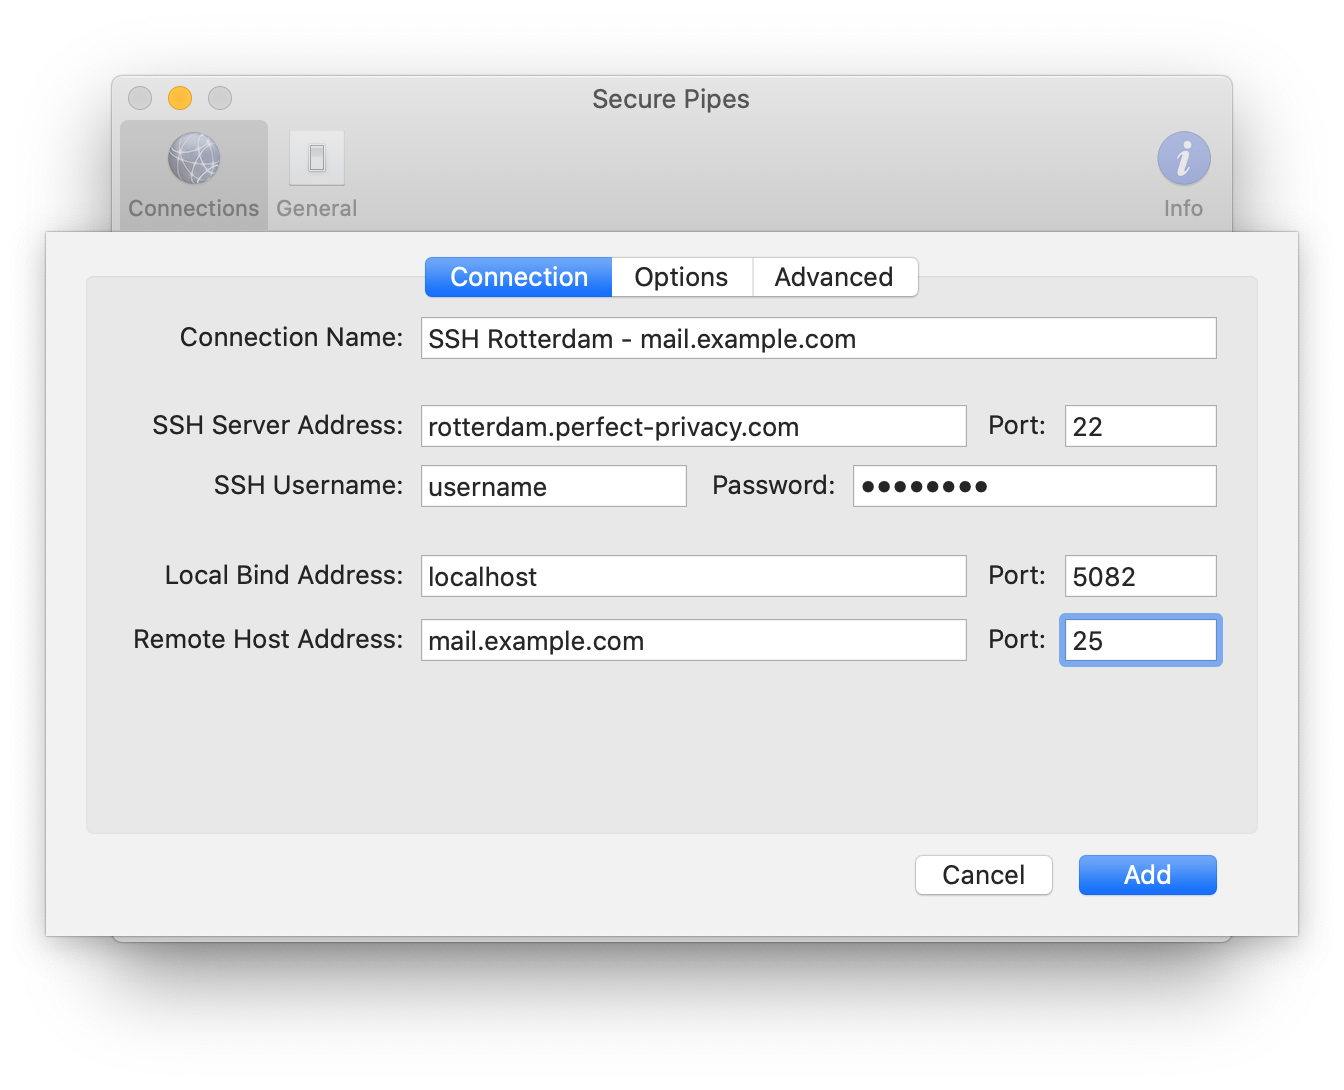
- SSH Tunneling: SSH tunneling allows you to forward network traffic through an SSH connection, enabling you to access services running on your IoT device that are not directly exposed to the internet. This is particularly useful for accessing web interfaces or other applications.
- Port Forwarding: By using port forwarding, you can forward traffic from a port on your Mac to a specific port on your IoT device. This is another way to access services running on the device.
- SSH Keys: Using SSH keys instead of passwords adds an extra layer of security and eliminates the need to enter your password every time you connect.
Security Considerations
Security is paramount when dealing with remote access to IoT devices. Here are some security best practices to consider:
- Strong Passwords: Always use strong, unique passwords for your IoT devices.
- Regular Updates: Keep your IoT devices and your Mac's operating system up-to-date with the latest security patches.
- Firewall Configuration: Configure firewalls on both your Mac and your network to restrict unauthorized access.
- SSH Key Authentication: Use SSH key authentication instead of passwords for added security.
- Monitoring and Auditing: Regularly monitor your IoT devices for any suspicious activity or unauthorized access attempts.
Expanding Possibilities and Future Trends
The integration of IoT devices into our daily lives is rapidly increasing, driving a growing demand for secure and efficient remote access solutions. The knowledge and techniques of SSH will serve you in a multitude of applications, from smart home automation to industrial control systems.
Conclusion
Connecting your IoT devices over the internet using SSH on a Mac opens up a world of possibilities for remote management, automation, and control. This guide has provided you with the knowledge and steps needed to establish a secure connection and begin exploring the potential of remote IoT access.
By mastering this valuable skill, you'll be able to confidently manage and monitor your IoT devices securely, ensuring convenience, efficiency, and enhanced control over your interconnected world.
Here's a sample table to help you.
Table: Key SSH Commands for IoT Devices
This table lists some of the most common and useful SSH commands when working with IoT devices. These commands will aid in configuration, maintenance, and remote control, all essential elements of managing an IoT ecosystem securely.
| Command | Description | Example | Use Case |
|---|---|---|---|
ssh username@device_ip | Connects to an IoT device via SSH. You will need to provide the username and IP address of the device. | ssh pi@192.168.1.100 | Remote access to the device's command line for configuration and management. |
ssh -p port_number username@device_ip | Connects to an IoT device via SSH, but it specifies a custom port number for the connection, which is useful if the SSH server is not running on the default port (22). | ssh -p 2222 pi@192.168.1.100 | Access to the device when the SSH port has been changed for security. |
scp file_path username@device_ip:/remote/path | Securely copies files to an IoT device using the SSH protocol. This is useful for uploading configuration files or software updates. | scp myconfig.txt pi@192.168.1.100:/home/pi/ | Secure file transfer for maintaining and updating IoT device software. |
ssh -L local_port:device_ip:remote_port username@device_ip | Creates an SSH tunnel, allowing you to access services running on the IoT device from your local machine. This is useful for accessing web interfaces or other services. | ssh -L 8080:192.168.1.100:80 pi@192.168.1.100 | Accessing web servers or other services hosted on the IoT device through a secure connection. |
ssh -D local_port username@device_ip | Creates a SOCKS proxy through the SSH connection, allowing you to route all of your internet traffic through the IoT device. | ssh -D 1080 pi@192.168.1.100 | Browsing the internet or accessing network resources as if you were directly connected to the IoT devices network. |
sudo [command] | Executes a command with administrative privileges. This is often necessary for making changes to the IoT device's system. | sudo apt-get update | Installing software or changing system settings on the IoT device. |
ifconfig or ip addr | Displays the network configuration of the IoT device, including its IP address and other network details. | ifconfig | Troubleshooting network connectivity and identifying the device's IP address. |
ping device_ip | Tests the network connection to the IoT device by sending ICMP echo requests. | ping 192.168.1.100 | Verifying that the IoT device is reachable and the network is functioning correctly. |
top or htop | Displays real-time information about the system's processes, CPU usage, and memory usage. | top | Monitoring the performance of the IoT device and identifying any resource-intensive processes. |
tail -f /path/to/log.txt | Displays the last lines of a log file and follows updates in real time. This is useful for monitoring the IoT devices activity and troubleshooting issues. | tail -f /var/log/syslog | Monitoring logs for errors, warnings, or other relevant information. |
Additional Notes:
- Replace place holder: In the above commands, remember to substitute username, device_ip, file_path, local_port, remote_port, and other place holders with the actual values specific to your IoT device and network setup.
- Security: Always secure your SSH connections with strong passwords or, preferably, SSH key authentication. Regularly update your devices to patch any security vulnerabilities.
- Practice: Experiment with these commands on a test IoT device to become familiar with them before using them on production devices.
By incorporating these commands into your workflow, you can efficiently manage, configure, and maintain your IoT devices from your Mac, enhancing security, productivity, and control.


Detail Author:
- Name : Prof. Isabelle Tillman MD
- Username : bethany.greenholt
- Email : considine.jordan@fadel.com
- Birthdate : 1972-01-05
- Address : 189 Alvina Path Port Sven, AL 41053-4181
- Phone : 253-633-0359
- Company : Ryan-Abshire
- Job : Motion Picture Projectionist
- Bio : Sapiente nam amet eos officia. Reprehenderit repellat unde sit repellendus aperiam molestias dolor. Sed asperiores est similique placeat animi nihil exercitationem.
Socials
linkedin:
- url : https://linkedin.com/in/grimesf
- username : grimesf
- bio : Libero autem adipisci nostrum minima qui qui.
- followers : 2967
- following : 394
tiktok:
- url : https://tiktok.com/@frankie_dev
- username : frankie_dev
- bio : Labore adipisci voluptatem dolores consequuntur beatae ratione.
- followers : 4813
- following : 1561
instagram:
- url : https://instagram.com/frankie.grimes
- username : frankie.grimes
- bio : Error aut pariatur exercitationem exercitationem quia. Ipsa voluptatibus illo ad eius.
- followers : 4161
- following : 804

 devices from your Mac without spending a dime? The answer is a resounding yes, and it's easier)