IoT SSH Access: Remote Access Guide (Windows & Mac)
Can you truly unlock the power of your Internet of Things (IoT) devices from anywhere in the world? The answer is a resounding yes, and Secure Shell (SSH) is your key to making it happen, offering a secure and convenient gateway to manage your devices remotely.
The landscape of modern technology is rapidly evolving, and at its heart lies the Internet of Things (IoT). These interconnected devices are transforming industries, automating homes, and reshaping the way we interact with the world. However, the true potential of IoT is often limited by the physical constraints of its deployment. How do you troubleshoot a sensor in a remote location? How do you update firmware on a device miles away? The answer lies in the ability to access these devices remotely. Fortunately, SSH provides a robust solution.
At its core, SSH is a cryptographic network protocol designed for secure remote access. It establishes an encrypted connection between your computer and the target IoT device, allowing you to execute commands, transfer files, and manage the device as if you were physically present. This capability is invaluable for developers, engineers, and tech enthusiasts alike.
- Jeremy Meeks From Mugshot To Model His Inspiring Journey
- Morena Mitch Videos Explore The Hottest Content
The beauty of SSH lies in its versatility. It works across various operating systems, including Windows, macOS, and Linux, making it a universally applicable solution. Whether you're managing an AWS IoT instance or a Raspberry Pi-based project, SSH provides the secure tunnel you need.
The initial steps involve ensuring your IoT device is correctly configured and connected to the internet. Youll also need to secure your connection by creating a strong password or using SSH keys. Once this is in place, you're ready to take the next step. To connect, you'll need the IP address of your IoT device on your local network, which you can typically find in the device settings or your routers administration interface. For situations where your IP address dynamically changes, a Dynamic DNS (DDNS) solution can be implemented to keep track of your gateway router's IP address, ensuring persistent remote access.
Now, let's delve deeper into the process and address the core of the matter: establishing a secure, remote connection to your IoT devices using SSH. This involves configuring your network and utilizing the appropriate tools to create a secure tunnel. By mastering this skill, you will be empowered to monitor, manage, and troubleshoot your IoT devices from virtually anywhere with an internet connection. Let's explore how to achieve this.
- Naval Ravikant Krystle Cho Life Love Success Read Now
- Rhodes Family The Legacy Story Of Wrestlings Royalty
The primary goal is to establish a secure channel over an unsecured network. SSH achieves this through a combination of encryption and authentication. When you connect to your IoT device via SSH, all data transmitted is encrypted, protecting it from eavesdropping. Furthermore, SSH uses robust authentication mechanisms to ensure only authorized users can access the device. This ensures that the channel is secure and allows you to control your IoT devices safely.
Connecting to an IoT device over the internet using SSH is a skill that can significantly enhance your capabilities, especially when you are looking to deploy the device in a public network, to control and manage IoT devices remotely, especially across platforms.
To truly grasp the power of remote access, lets examine the tools and techniques required to achieve it on various platforms. We'll start with the fundamental steps for Windows and then explore the nuances of doing it on macOS. With each step, we will break down the essential commands and configurations. The aim is not only to provide instructions but also to impart the knowledge that will empower you to adapt to different situations and platforms as your IoT projects evolve.
Whether you are a seasoned developer, an enthusiastic engineer, or a tech enthusiast, SSH opens doors to a new level of control and management, allowing you to monitor and manage devices with ease.
For those who want to connect via a web browser, the method remains similar. Setting up a VNC server on a Raspberry Pi, for instance, allows users to access the Pis desktop from anywhere with an internet connection using a VNC client. This offers a visual interface for interaction.
Now, let's discuss how to connect to your IoT device using SSH on a Windows 10 machine. The process, though straightforward, necessitates certain prerequisites.
First, you'll require an SSH client. A widely used, reliable choice is PuTTY, a free and open-source terminal emulator that supports SSH. Download and install PuTTY on your Windows 10 machine. You'll also need the IP address of your IoT device and its login credentials.
With the client installed, open PuTTY and enter the IP address of your IoT device in the 'Host Name (or IP address)' field. Ensure that the connection type is set to SSH. Then, click 'Open.'
If the connection is successful, PuTTY will prompt you for the username and password of your IoT device. Enter the credentials and press Enter. After successful authentication, you'll be presented with the command-line interface (CLI) of your IoT device. From here, you can execute commands and manage your device remotely.
Next, let's delve into how to establish a secure connection over the internet and how to approach this on a Mac. The principles remain constant: SSH, security, and secure channels.
The process to connect to an IoT device via SSH on a Mac is equally direct, relying heavily on the built-in terminal application. There's no need for additional software. However, just like on Windows, youll need to know your IoT devices IP address and login credentials.
Open the Terminal application, which you can find in /Applications/Utilities/. In the terminal window, type the following command and replace the placeholders with the correct information:
ssh
Replace ssh admin@192.168.1.100. Then press Enter.
The terminal will prompt you for the password for your IoT device. Enter the password and press Enter. If your credentials are correct, you will be logged into the command line interface of your IoT device.
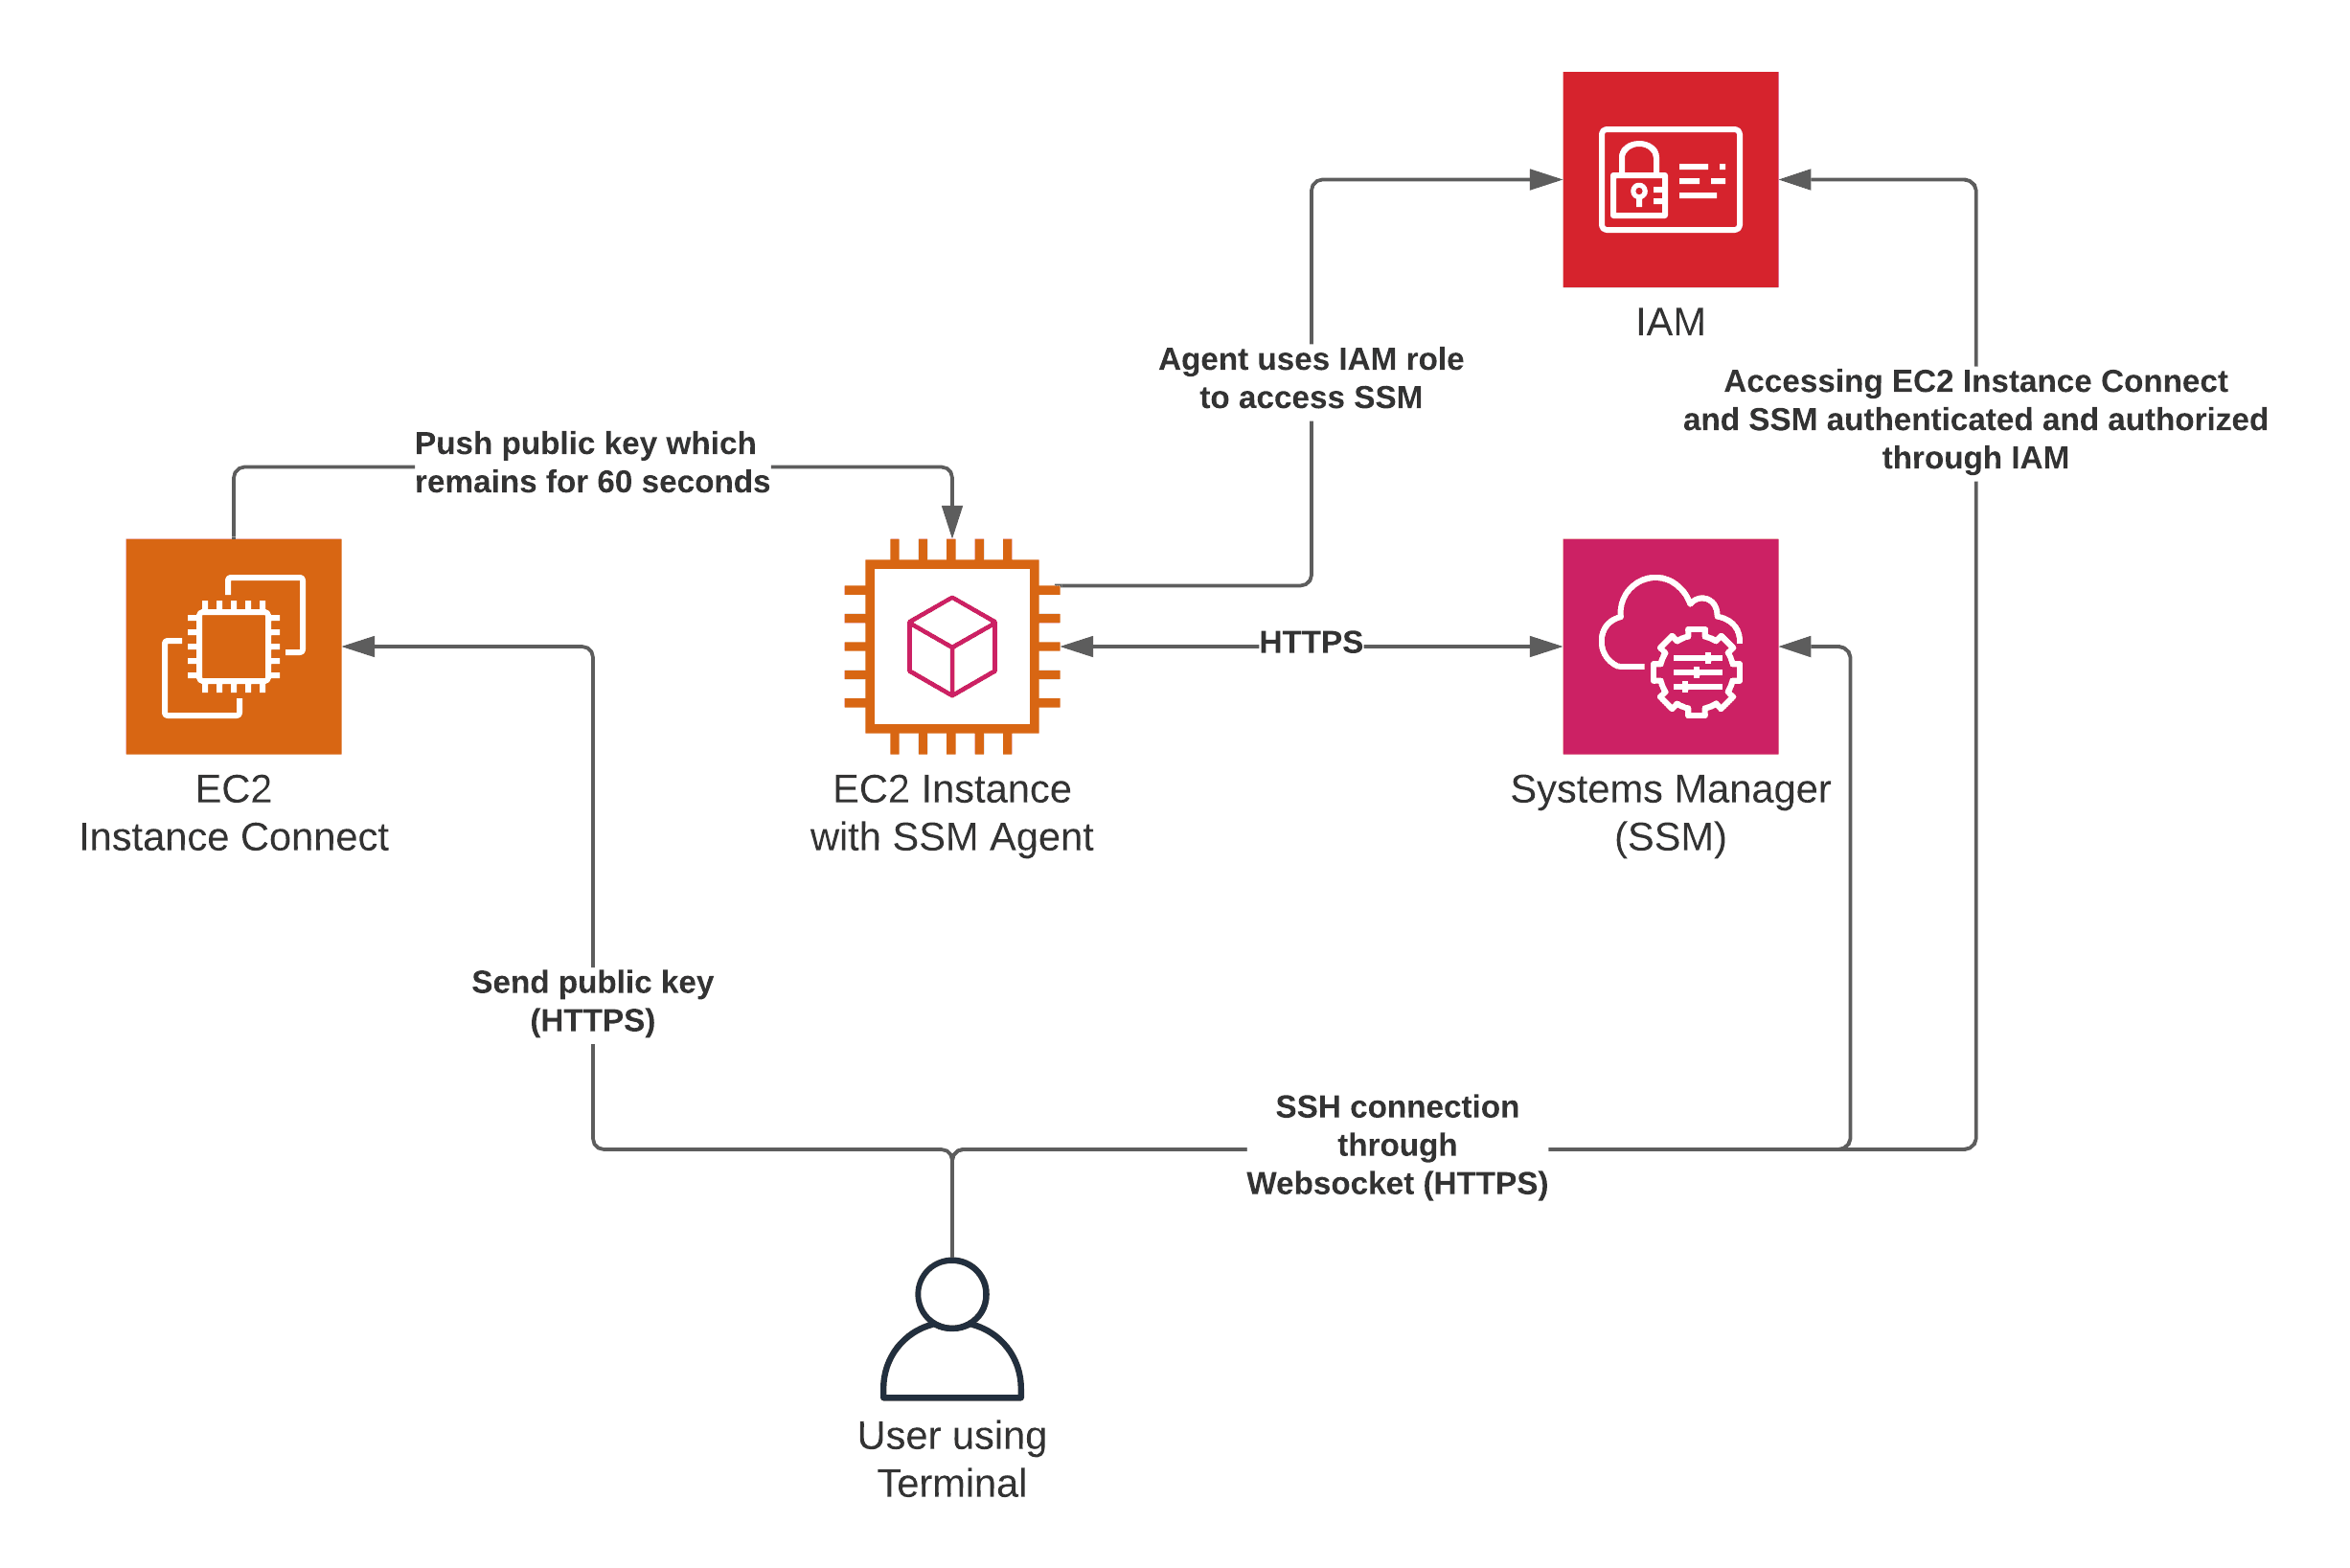
Now, let's talk about the use of reverse proxy tunnels. In essence, a reverse proxy acts as an intermediary, allowing you to access an SSH client behind a NAT router or firewall from a public SSH server. This setup involves creating an SSH connection (or tunnel) from the SSH client to the SSH server.
If you are accessing from behind a NAT router, you may need to set up port forwarding on your router. This involves configuring your router to forward incoming SSH connections on a specific port to the internal IP address of your IoT device. Once you have set up port forwarding, you can connect to your IoT device from the internet using your public IP address and the port you specified.
One method to consider is using a service such as SocketXP. SocketXP uses secure reverse proxy SSL/TLS tunnels to connect to your Ubuntu Linux device over the internet, preventing direct exposure to the internet. The data transmitted is also encrypted using SSL/TLS. With this method, there is no need to configure port forwarding.
For more security, SSH uses the same cryptography technology as banks and governments to exchange highly confidential data over the internet.
If you are working with AWS, you will need to create an EC2 instance and set up your SSH keys. You must configure security groups to allow SSH traffic. Once that is complete, you can access your IoT device through the EC2 instance using SSH.
With these approaches, connecting SSH to your IoT device over the internet becomes a secure and manageable process.
Here's a quick guide to the tools you will need to get started:
- An IoT Device: This could be a Raspberry Pi, Arduino, or any other device that supports SSH.
- A Computer: This is the device from which you will be connecting to your IoT device.
- An Internet Connection: This is essential for accessing your IoT device remotely.
- An SSH Client: If you're on Windows, you'll need to install an SSH client like PuTTY. macOS and Linux typically have built-in SSH clients in their terminal applications.
- The IP Address of Your IoT Device: You'll need this to initiate the SSH connection.
- Login Credentials: Your username and password for the IoT device.
Once you have all of these tools and requirements, you are ready to go. Connecting to your IoT device is not as difficult as you might think. Remember the following points to help:
- Find Your IoT Device's IP Address: This is crucial. You can typically find it in the device settings, router interface, or by using a network scanner.
- Create a Strong Password or Use SSH Keys: Security first. Using SSH keys is the more secure option.
- Configure Port Forwarding: If accessing your device from outside your local network, you'll likely need to set up port forwarding on your router.
- Test the Connection: Always verify that your connection is working before you assume it is.
Once you have a secure connection, you can remotely control and manage your IoT devices, ensuring both convenience and security. Whether you're a developer, engineer, or tech enthusiast, this capability will enhance your ability to handle and monitor your devices. By following this guide, you'll have a clear understanding of how to connect SSH to your IoT device over the internet.
By integrating these tips and techniques, you can confidently access your IoT devices from anywhere in the world, creating more robust and functional IoT projects.

Detail Author:
- Name : Asha Sawayn
- Username : nhessel
- Email : miles.shields@homenick.com
- Birthdate : 1975-06-29
- Address : 243 Jacobi Drive Suite 472 Hermanmouth, ID 99703
- Phone : +13412650492
- Company : Kassulke-Hane
- Job : Telemarketer
- Bio : Consequatur est iure perspiciatis voluptatem. Iure qui aut at expedita laudantium consequatur.
Socials
linkedin:
- url : https://linkedin.com/in/nils_official
- username : nils_official
- bio : Dolorum quae aut ipsam est et in.
- followers : 4561
- following : 2301
tiktok:
- url : https://tiktok.com/@nils5976
- username : nils5976
- bio : Excepturi veritatis aut maiores unde enim.
- followers : 2648
- following : 709
facebook:
- url : https://facebook.com/nilsmonahan
- username : nilsmonahan
- bio : Doloribus provident sed dolores deserunt.
- followers : 3888
- following : 2648

 devices from anywhere in the world? The answer is a resounding yes, and Secure Shell (SSH) is yo)