Build Secure IoT: Raspberry Pi & AWS VPC Guide
Are you ready to transform your IoT projects from a tangle of wires and limitations into a streamlined, secure, and globally accessible system? The convergence of Raspberry Pi and Amazon Web Services (AWS) offers a powerful, cost-effective, and remarkably adaptable solution for managing and processing data from connected devices, opening doors to unprecedented control and efficiency.
In the ever-expanding landscape of the Internet of Things (IoT), the ability to manage and process data from connected devices efficiently is no longer a luxury, but a necessity. Businesses and individuals alike are constantly seeking innovative ways to harness the power of interconnected systems, from smart homes and remote sensors to industrial automation and beyond. The challenge lies in creating solutions that are not only functional but also secure, scalable, and adaptable to evolving needs. This is where the synergy of Raspberry Pi and AWS truly shines.
This article delves into the technical intricacies of setting up a Remote IoT VPC network using Raspberry Pi and AWS, providing you with a comprehensive guide to building a robust, secure, and efficient IoT infrastructure. We'll explore the fundamental concepts, step-by-step configurations, and best practices necessary to create your own digital fortress in the cloud, enabling you to manage your devices from anywhere in the world.
- Discover Clothoff Ai Undress Photos Instantly Free
- Diddy Scandal Shocking Celebrity List Allegations Unveiled
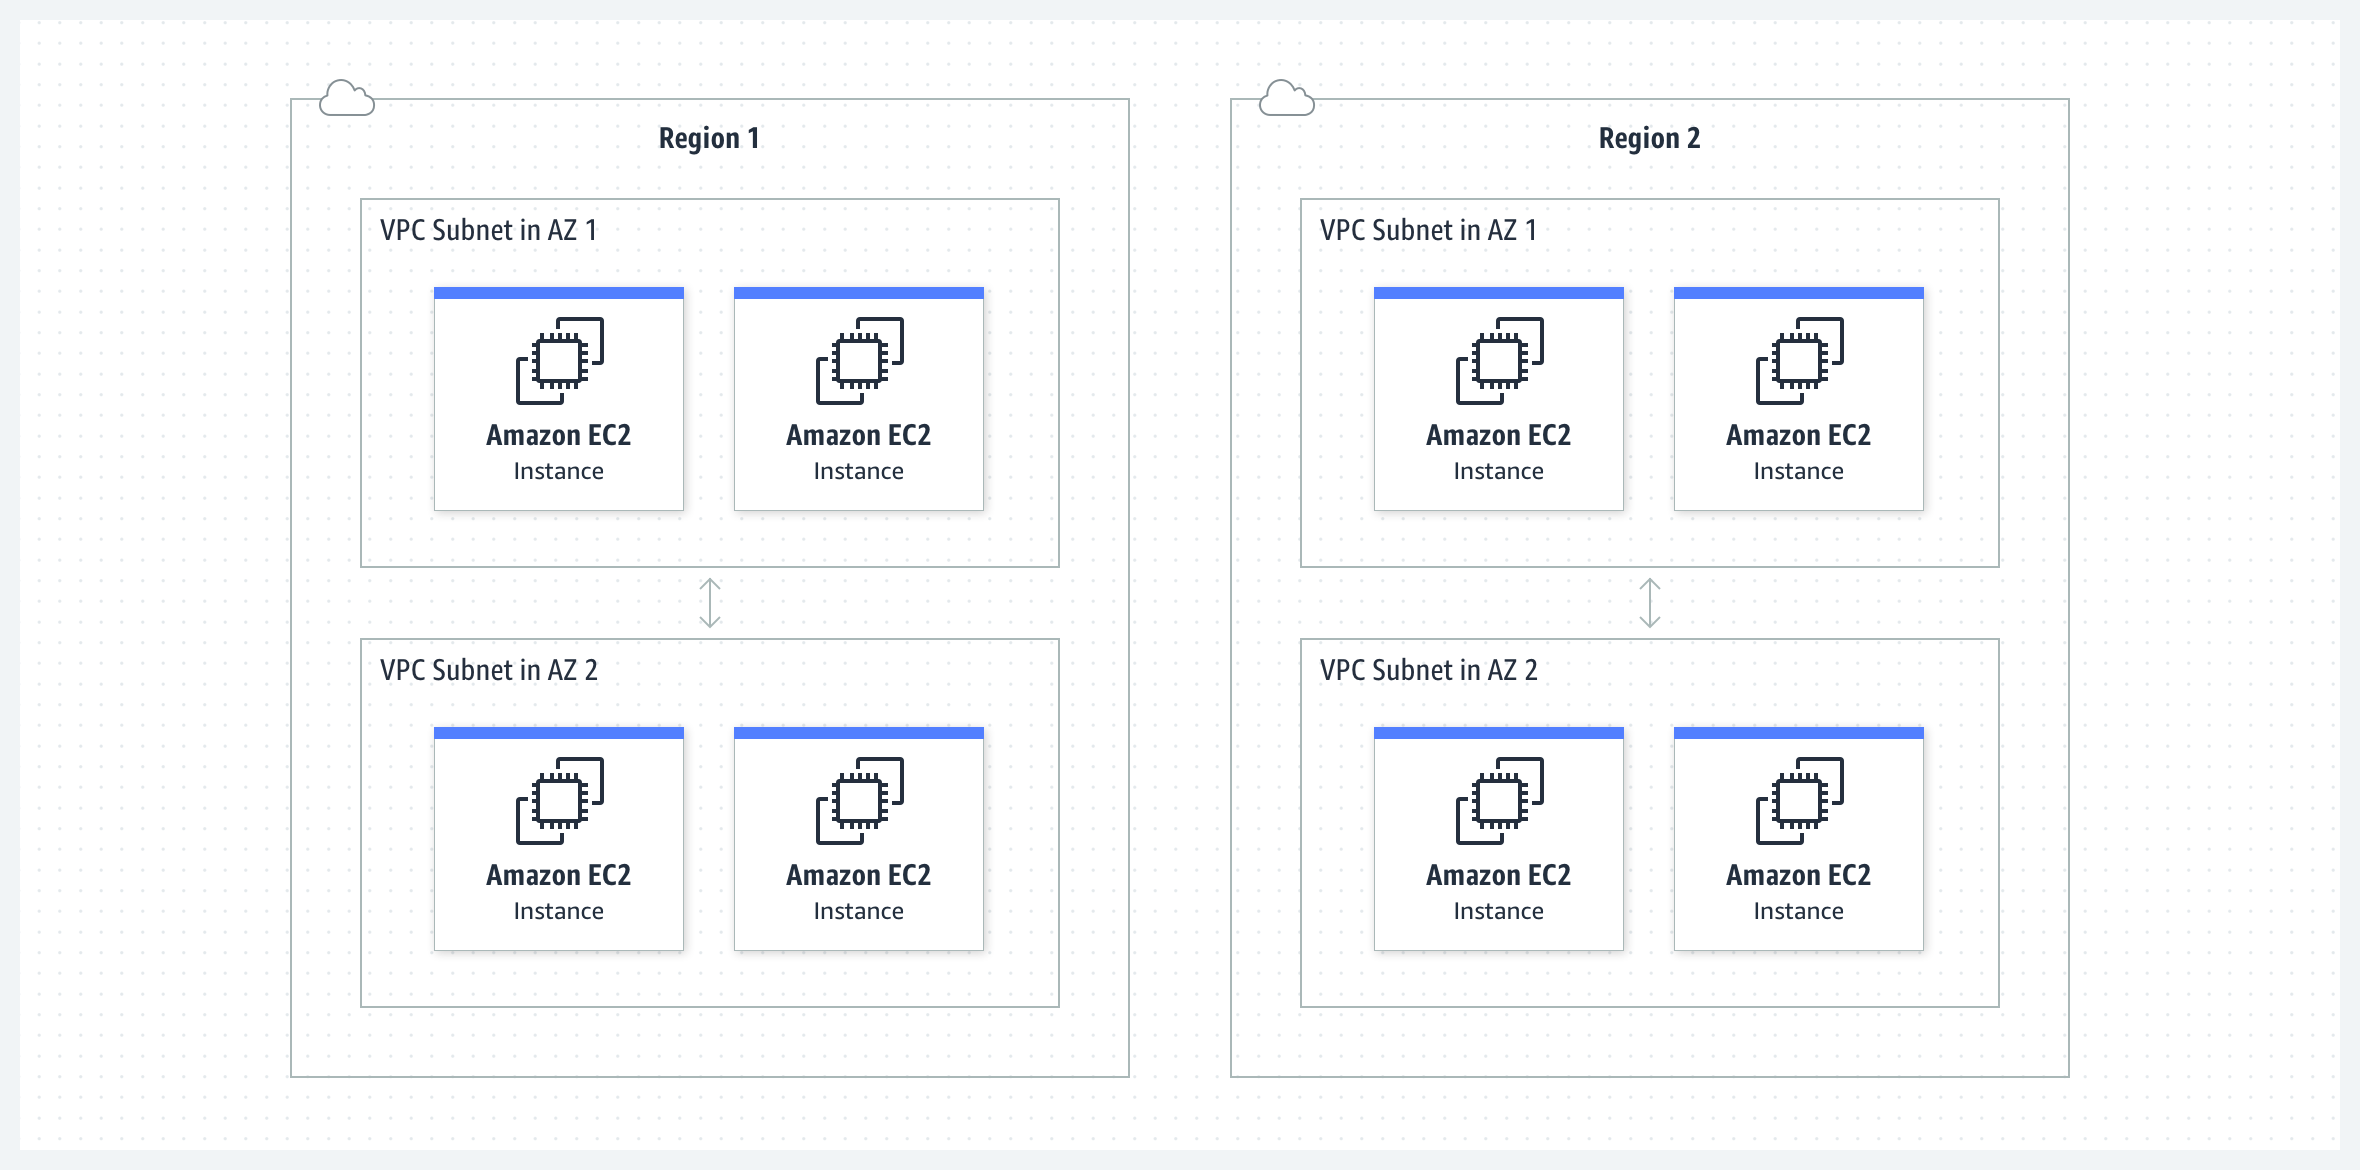
The foundation of this system lies in the Virtual Private Cloud (VPC), a private network hosted within the public cloud infrastructure of AWS. This provides an isolated environment for your IoT devices, ensuring secure communication and protecting your data from unauthorized access. By leveraging VPC configurations, you can establish secure communication between your Raspberry Pi and AWS services, facilitating seamless data flow and enhancing operational efficiency. Security groups are critical to control access to your VPC. You define inbound and outbound rules to allow only the traffic necessary for your IoT network, thereby safeguarding your system against potential threats. This is a core component of remote IoT solutions.
The Raspberry Pi, with its versatile hardware and open-source nature, serves as the intelligent gateway and processing unit for your IoT projects. Its affordability and ease of use make it an ideal platform for connecting a wide range of sensors and devices. As we explore the intricacies of setting up a remote IoT VPC network, youll learn how to configure your Raspberry Pi as an IoT gateway, allowing it to communicate with the cloud.
Connecting a Raspberry Pi to AWS is a core skill for anyone building remote IoT solutions. Once your Raspberry Pi and AWS VPC are configured, the next step is to establish a secure connection between them. This involves configuring the necessary networking settings and establishing a robust link. The subsequent sections will offer detailed, step-by-step instructions.
- Discover Catalinasof Bio Content More Latest Updates
- Tony Vitello Coaching Family And Vols Baseball Success
AWS provides the infrastructure and services needed to build a scalable, secure, and efficient IoT solution. AWS IoT Core, in particular, is a managed cloud service that enables you to connect your devices securely to the cloud. With your VPC set up, its time to connect your Raspberry Pi to AWS IoT Core. Before your Raspberry Pi can communicate with AWS IoT Core, it needs to be authenticated, and you can generate certificates and keys using the AWS IoT console.
Setting up a remote IoT VPC network using Raspberry Pi on AWS isnt just about connecting gadgets its about creating a smart, scalable system that can adapt to your needs. Think of it like building your own digital fortress, except this one talks to your fridge and adjusts the thermostat when you're not even home. Imagine controlling your smart home devices or managing remote sensors from anywhere in the world. Setting up a remote IoT VPC network with Raspberry Pi using free AWS resources is an innovative way to leverage cloud computing for your IoT projects. Remote IoT VPC network provides a secure virtual private cloud environment, Raspberry Pi offers versatile hardware for IoT projects, and AWS delivers unparalleled cloud.
Combining Raspberry Pi with AWS creates a powerful synergy that opens up new avenues for remote IoT applications. With remote IoT, users can seamlessly connect to their Raspberry Pi devices from anywhere in the world without compromising security. A virtual private cloud (VPC) is a private network hosted on a public cloud infrastructure. It provides users with isolated networking capabilities to securely run their workloads. In this guide, we'll delve into the technical aspects of creating a remote IoT VPC network, including configuring Raspberry Pi, setting up AWS services, and ensuring data security. Let's jump in and discover how cloud computing can supercharge your IoT projects!
The journey begins with setting up your Raspberry Pi on AWS. While this might sound intimidating, the right guidance makes it a breeze. Let's explore how this works.
Here are the steps to achieve this:
- Set up the Raspberry Pi to use a static IP address within the VPC subnet.
- Connecting raspberry pi to aws iot core.
In this article, we'll walk you through every step of setting up a remote IoT VPC network using Raspberry Pi and AWS. You'll learn how to configure a virtual private cloud (VPC), lock down your connections, and integrate Raspberry Pi into the mix. As we dive deeper into the realm of remote IoT networking, you'll learn how to configure Raspberry Pi as an IoT gateway, set up a VPC network on AWS, and ensure smooth communication between devices. Let's jump in and discover how cloud computing can supercharge your IoT projects!
Below is a step-by-step guide to create a remote IoT VPC network with Raspberry Pi on AWS:
- Define Your Project: Identify the specific IoT application you want to build (e.g., smart home, environmental monitoring, industrial automation). This will help determine the necessary hardware, sensors, and cloud services.
- Set Up Your AWS Account: If you don't already have one, create an AWS account. You may be eligible for the AWS Free Tier, which provides free access to certain services for a limited time.
- Configure Your VPC:
- Log in to the AWS Management Console and navigate to the VPC service.
- Create a new VPC, specifying an IPv4 CIDR block (e.g., 10.0.0.0/16) for your private network.
- Create subnets within your VPC. Subnets divide your VPC into smaller networks. You'll typically want at least one public subnet (for internet access) and one private subnet (for your Raspberry Pi).
- Configure Internet Gateway:
- Create an Internet Gateway and attach it to your VPC. This allows your resources in the public subnet to access the internet.
- Create a route table and associate it with your public subnet. The route table should have a route that directs internet-bound traffic (0.0.0.0/0) to the Internet Gateway.
- Configure a NAT Gateway (or NAT Instance):
- Create a NAT Gateway (recommended for simplicity and reliability) or a NAT instance within your public subnet. The NAT Gateway allows instances in the private subnet to access the internet for software updates and communication with AWS services like IoT Core.
- Create a route table and associate it with your private subnet. The route table should direct internet-bound traffic (0.0.0.0/0) to the NAT Gateway.
- Create Security Groups:
- Create security groups to control network traffic. You'll need at least two security groups:
- For your Raspberry Pi: Allow inbound SSH (port 22), and any necessary outbound traffic (e.g., to AWS IoT Core).
- For AWS IoT Core: Allow inbound traffic from your Raspberry Pi's security group on the required ports (typically MQTT port 8883).
- Create security groups to control network traffic. You'll need at least two security groups:
- Set Up Your Raspberry Pi:
- Install an operating system (e.g., Raspberry Pi OS) on your Raspberry Pi.
- Configure a static IP address for your Raspberry Pi within the private subnet of your VPC.
- Install the necessary software and libraries (e.g., MQTT client, AWS IoT SDK) on your Raspberry Pi.
- Connect to AWS IoT Core:
- In the AWS IoT console, create an IoT thing to represent your Raspberry Pi.
- Generate certificates and keys for your Raspberry Pi to authenticate with AWS IoT Core.
- Configure your Raspberry Pi's MQTT client to connect to AWS IoT Core using the generated certificates and keys.
- Test Your Connection:
- Test your connection by sending and receiving messages between your Raspberry Pi and AWS IoT Core. You can use the AWS IoT console to monitor messages.
- Implement Your IoT Application:
- Develop the application logic on your Raspberry Pi to collect data from sensors, process the data, and send it to AWS IoT Core.
- Use AWS IoT services (e.g., IoT Rules Engine, IoT Analytics) to process, store, and analyze the data in the cloud.
With remote IoT, users can seamlessly connect to their Raspberry Pi devices from anywhere in the world without compromising security.


Detail Author:
- Name : Samson Waters III
- Username : mayert.cali
- Email : emmanuelle.olson@yahoo.com
- Birthdate : 1998-04-23
- Address : 20780 Sigurd Hill North Herminastad, NH 64231
- Phone : 830.299.1909
- Company : Boyer, Hettinger and Harber
- Job : School Social Worker
- Bio : Et incidunt ut doloribus soluta. Placeat non dolores fugiat voluptas. Culpa occaecati omnis corrupti culpa qui consequuntur non recusandae.
Socials
tiktok:
- url : https://tiktok.com/@franz8696
- username : franz8696
- bio : Saepe illo et voluptas delectus. In illum sequi pariatur non.
- followers : 1986
- following : 1768
instagram:
- url : https://instagram.com/fgreen
- username : fgreen
- bio : Ipsam ea quod voluptatem omnis sunt. Qui in sint quis iste. Corrupti aut qui maiores tenetur.
- followers : 4588
- following : 655
linkedin:
- url : https://linkedin.com/in/franz6222
- username : franz6222
- bio : Est quia accusantium qui optio voluptatem iure.
- followers : 1873
- following : 938
facebook:
- url : https://facebook.com/greenf
- username : greenf
- bio : Rem qui possimus asperiores necessitatibus nihil.
- followers : 1433
- following : 389
twitter:
- url : https://twitter.com/green1984
- username : green1984
- bio : Est et numquam nihil odit. Quibusdam illum optio illum asperiores sint ad itaque veniam. Optio totam tempora aut alias sapiente dolorum voluptatem.
- followers : 2345
- following : 227
